Part three of a five-part series on methods for backing up your Salesforce data.
In our five-part series on backing up your Salesforce data methods, we break down several options, including the Weekly Export and Reports, the Salesforce API, and a Full Sandbox.
With the retirement of Salesforce’s last-resort Data Recovery service, organizations now have one fewer data backup option. If you’re a Salesforce admin, this means one more decision you have to make. How will you back up and recover your organization’s data now that this safety net from Salesforce is no longer available?
In this article, we’ll examine another native option from Salesforce, Data Loader, and outline the process of backing up your data using this tool.
Advantages of Salesforce Data Loader
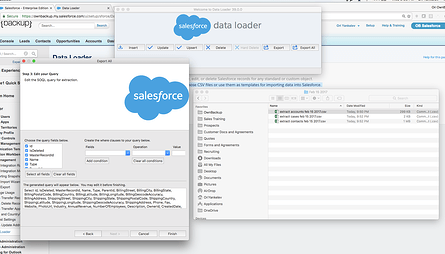
Data Loader is a tool used to import, export, and delete large volumes of data within a Salesforce Org. When importing data, Data Loader reads, extracts, and loads data from .CSV files or the Bulk API. When exporting data, it outputs .CSV files, similar to the Weekly Export. Just keep in mind that while the Weekly Export processes all files into one or more .zip files, Data Loader only processes one .CSV file at a time.

One of the most appealing things about Data Loader is that it’s free with both Salesforce Classic and Lightning editions. Users can either install the data loader in a Mac/Windows environment with the user interface or use a Windows command line to specify data files.And since Salesforce built it, Data Loader integrates easily with the platform and can be used by multiple team members, from developers to admins.
Another major advantage of Data Loader is the sheer volume of data that it can manage. The tool allows users to load anywhere from 50,000 to five million records at a time. Salesforce’s Data Import Wizard, a similar tool, only lets you load up to 50,000 records.
Data Loader also provides users with the ability to save field mappings for further use instead of choosing the fields for mapping each time, saving them time in the importing process.

For the reasons mentioned above, Data Loader has become a popular tool for managing Salesforce data. And while often used for importing data into Salesforce, it can also be leveraged to export data for backup purposes.
Still, be cautious if you’re using Data Loader as your sole backup and recovery solution. The backup process is very similar to the Weekly Export, which involves manually downloading .CSV files or scheduling an export, a very time-consuming process. Unlike the Weekly Export, however, you CAN use the Data Loader tool to restore data into Salesforce.
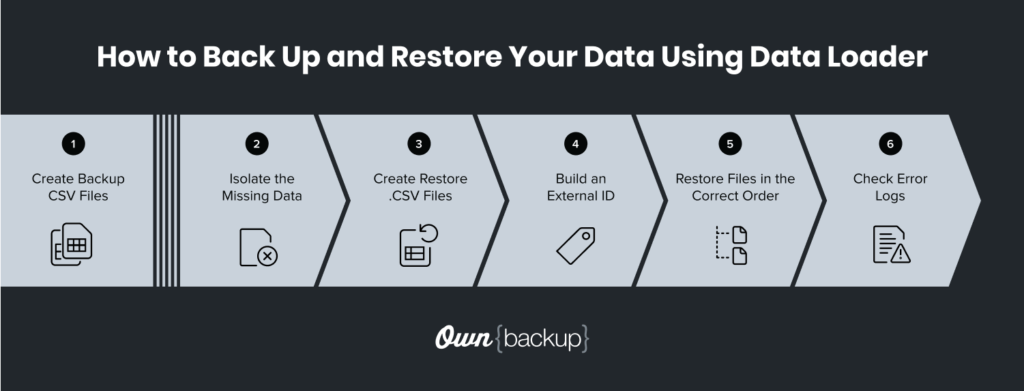
1. Create Backup CSV Files and/or Schedule Export
To back up your Salesforce records, you’ll first need to export .CSV files of your data. Since it’s a manual process, you’ll likely do this once a week at most. Keep in mind how this affects your organization’s recovery time objective, as you’ll lose data that was changed or deleted in between backups.
NOTE: If you are running Data Loader from the command line interface, there is a workaround that allows you to schedule a data loader export to run at a specific time. You can do this by using the Windows Task Scheduler application. Here is a helpful article on how the scheduling process works.
Since you can only insert one object at a time using Data Loader, you will need to create a separate .CSV for each object. These objects can include accounts (parent), contacts (child), opportunities (child), and custom objects (lookup).While this process can be manual and time-consuming, it's a critical component of any good backup and recovery strategy.
Several other things to keep in mind when exporting .CSV files:
- They are often stored on laptops or other less secure media and can create a potential IT security risk.
- .CSV files don’t include metadata or attachments, so you will have to rebuild custom settings and relationships manually.
- You’ll need to create a directory structure and naming conventions to manage all of your import files.
2. Isolate the Missing Data
If you think (or know) you’ve lost data, the first step is to size the damage and isolate the missing data. Sizing the damage involves getting two sets of data from two different dates--one from before the data loss and another after the data loss. Typically, you can extract both of these data sets using the .CSV files from step 1.

3. Create Restore .CSV Files
Once you identify the records requiring a restore, you need to create a separate file for each lost Salesforce object. These objects include accounts (parent), contacts (child), opportunities (child), and Custom Object Lookups (orphan). Start with the parent records lost, then review the child and orphan files for related deletions. It’s then a matter of copying and pasting the lost records into new individual files and saving them as .CSV files.
4. Build an External ID
When someone deletes records in Salesforce, the current ID value is lost, and Salesforce will assign new ID values upon restoration. Unique IDs present a problem for every related object because you’ll need to preserve the relationships based on the old IDs to have a complete recovery process.

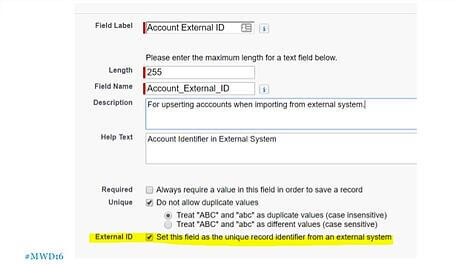
One way to maintain these connections is to use the old ID values as a new external ID field to join related records. When performing a data import to restore deleted records, an external ID can also act as the common thread between associated objects.
5. Restore Files in the Correct Order
When importing .CSV files into Salesforce, the processing order of the files is important. Establish the parent object records first to generate new ID values. Then, add the child object records to rebuild the correct relationships to each parent record. Keep in mind that when restoring child objects, these should be an UPSERT instead of an INSERT.

If your file includes an object’s external IDs with a relationship to your chosen object, enable that external ID for record matching by selecting its name from the dropdown list. If you make no selection, you can use the related object’s ID field for matching by mapping it.
6. Confirm Imports Were Successful
As the operation proceeds, a progress information window reports the status of the data movement. If everything went well, there would be successes, otherwise, investigate the errors and make the necessary mapping corrections.

Backing up and restoring your data using Salesforce Data Loader involves many steps. Importing some of the more common relationship types such as master-detail, many-to-many, and lookup are challenging enough. Other relationships will require performing multiple inserts, updates, or upserts on the same table to restore the records properly. These include records with numerous parents, polymorphic fields, intra-object relationships, and attachments.
In particular, if you have a large, complex Salesforce environment, Data Loader will not support your backup and recovery needs.
Eliminate Data Downtime with Own
Consider a partner solution from the AppExchange, like Own, that automates these processes.
With Own, you can identify a data loss in real-time, quickly understand the extent of the loss with visual compare and find capabilities, and recover that data in minutes with just a few clicks. Own customers feel 3x more prepared to restore from a data loss or corruption than non-customers.


_low%20copy.jpg)


